Golden Highlighted Eyes and Nude Lips!

So this post is gonna be my first ever “tutorial” here on my blog. Honestly I did this look a few weeks back and had no intention on it being a tutorial I was just having fun with my makeup,but I really liked how it turned out so why not share it. I don’t have that many photos in terms of a step by step process because as I stated I didn’t know that I would be posting this but I believe it can still be useful. Firstly:

1. I primed my face with the BH cosmetics foundation primer.

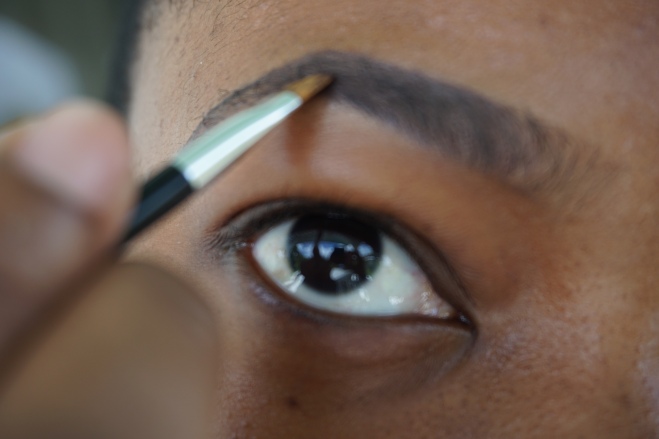
2. I then did my usual eyebrow routine that I have a post on here

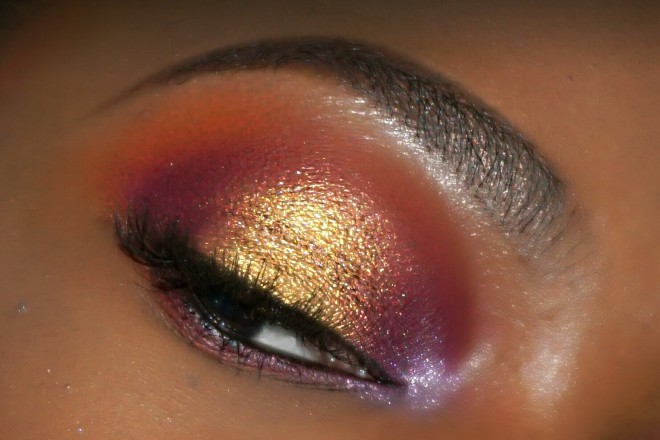
3. I primed my eyes with a white creamy base to make the colors more vibrant the NYX Jumbo pencil in milk will be perfect.

4. For the eyes I used my Nubian 2 & Masquerade palette. I used The shade “Jezebel” and “Morrocco” as my transition color then I went into the shade “Zobo” in my inner and outer corners in the middle I popped on the lovely gold color that you see “Nairobi”. For the inner come I used a lavender shimmer shade from my BH 88 shimmer palette. I then lined my waterline with a black pencil eyeliner (anyone would do the trick). I used some mascara to top of the look and as for lashes I was already wearing individuals from Ardell which I will do a blog post about “how to apply them” pretty soon.

IMG_20171021_182845 (2)

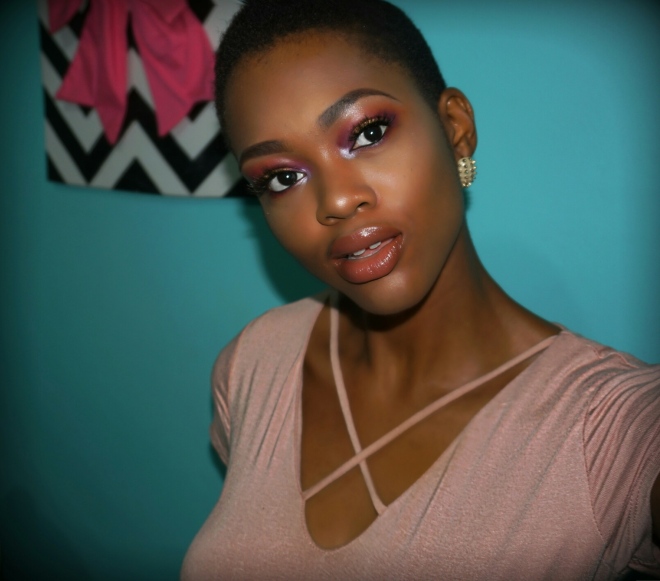
5. For foundation I used the Milani conceal + perfect 2-in-1 concealer and foundation in chestnut before applying foundation however I color corrected with the l.a girl orange corrector.

6. Concealer I used my l’oreal true match in medium/deep that I absolutely love, and to highlight my l.a. girl concealer in warm honey.

7. Powder I used my l’oreal infallible pro-matte powder in classic tan that matches my skin perfectly and to set my under eye highlight I lightly baked using the Sacha Buttercup Setting Powder.

8. To contour I used the BH cosmetics contour & blush 2 palette

9. I finished off the look using Sacha cosmetics Intense lipshine gloss in “Whatever”, that I also have a review ohere

IMG_20171021_180354

Hope you guys enjoyed this post/mini tutorial although its not as in depth as i would have liked it, I do promise to get better. Thanks for reading and have a great weekend.

xo Jenique


How I Clean my Makeup Brushes

Now let’s keep it real with each other guys none of us really enjoys cleaning our makeup brushes and for those out there that do…..you clearly are not human jk we wanna know your ways. Now I’m not here to judge how often one cleans their brushes as I’m the last one that should be talking. But I just wanted to do a short post on how I clean my makeup brushes.

20170925_110901
My makeup brushes before I clean them.

I don’t take very long to clean them but they are pretty clean and spotless when I’m finished. I also never had any problems with any unsticking or anything like that and I use pretty cheap brushes (I guess I just got lucky *crosses fingers*).

This is how I clean them-:

  1.  I don’t use anything too expensive in fact I use regular powdered soap and it gets the job. When I’m finished they are really clean.

So this is just a short clip of the process that I go through to get my brushes clean. If you want to finish quicker you can do several of your smaller brushes at a time. And yes I watch youtube videos to skip the time 😊.Hope you enjoyed this quick post and have a great week guys.

xo Jenique


Garnier SkinActive – Micellar Cleansing Water First Impressions and Review!

I want to jump right into this post as I am literally just done using this product for the first time and I want it to be fresh in my mind hence the FIRST impressions lol. I know I’m late to the party in giving this bad boy a try but hey better late than never right? I must admit I never really got fantastic results from a Garnier product in the past so I was going into this with my fingers crossed. But the hype behind this product was to big to ignore and to not give a try. When the Garnier Micellar Cleansing Water was first launched it only had the one that most of us are familiar with which is the pink bottle (for all skin types). But since then they came out with a number of different types. Those specifically for oily skin, dry skin, acne prone and so on.

Garnier2
From left to right: dry & sensitive skin, all skin types (original), oily skin and oily acne prone skin.
Garnier3
I believe this was an original as well, its also for all sin types but it says it removes waterproof makeup as well.

Me however, being the oily faced hot mess that I am picked up the green one which is  designed for oily skin as it claims to be mattifying. Now I usually use my makeup removing wipes and call it a night because honestly ain’t nobody got time for the long tail skincare routines that we see on youtube, like honestly how do those girls do it? But I want to try as much beauty products for you guys and do reviews on them so why not hop on the bandwagon.

Anyways, actually trying out the product I must admit I did not have on alot of makeup on but it is a first impressions and from what I had on it removed it really quickly. Also it is not just a makeup remover it is also a cleanser hence the name “cleansing water”. And I must say it did that well also, my face which at the end of the day is an oily mess I can even compare it to the amount of oil that exists in a deep fryer but I digress looked like I gave it a water based cleanse. Like seriously it looks like I actually washed it. So it definitely didn’t take away from my usual lazy routine, in fact i think it kinda added something because on extremely lazy nights when your not feeling to remove your makeup then go in with a cleanser and then have to wash it off you can just use this because it certainly is an all-in-1 product. You can remove your makeup plus your cleansing it at the same time and there is no need to rinse. How awesome is that?

DSC00476DSC00469

The only thing that I’m not a fan of is that it left my eyelids feeling a bit sticky. And no not my face but my eyelids lol. I figure its because I have extremely hooded eyes and its just my eyelids hanging, doing their own thing and touching but if anyone else has the same problem as me let me know.

All in all its a great product I understand the hype especially for the price. I mean you can remove your makeup, use it as a stand alone cleanser or just as a means to look fresher from having a hectic day. I definitely recommend it. If you have used this whether it be any of the other types let me know if you liked it or not and if you have not let me know if your gonna pick it up. Till next time loves 😘

xo

Jenique

My Eyebrow Routine

So I must come clean and say that the inspiration for this post came from reading another blog post on eyebrows and keeping them shaped and maintained etc. And seeing that there I say I’m a little proud of the way my turn out when I do them and more so the long way that I have come in doing them and having them look up to standard lol. Cause let’s be honest in today’s social media crazed world eyebrows are it, in fact it could either make or break your entire makeup look.

So finally getting a routine that I like and personally compliments my face was very important and I’m truly satisfied.

Getting a good routine came in the help of makeupshayla she has a video up on her YouTube channel so you could check it out if your interested.

1. I first begin by combing all the hairs in the direction in which they grow.


2. Using my bh cosmetics flawless brow trio in medium I use the brush that it comes with (it actually works really good) and going into the wax that the palette contains with the angular side of the brush I begin with the top of my brows. I dont start at the beginning of the brow however, I do this so I dont get that fake look and everything looks more natural  About 1/4 way in I start to outline the top of my eyebrow and go all the way down to the end if your eyebrow needs extending like mine just extend it so that it meets the end of your eye when you line it up.


3. Do the same as in step 2 with the bottom of the brow this time with a little amount of product and a light hand you can start at the beginning of the brow.


4. Using the other side of the brush and going into the lighter of the powder shades I fill in my eyebrow hairs. Again don’t begin at the beginning of the brow so as not to get that boxy fake look.


5. I then use the angular side of the brush and going into the darker shade I fill in the last half of my brow. Thus giving a nice blended gradient look.

DSC00455

6. Using a spooley I lightly comb all the hairs to finish blend everything together.

Thanks so much for reading and I hope that you found this helpful. Let me know what you think and have a good day guys.

Xoxo

Jenique